Sunday, April 15, 2012

Visual Studio 11 Project Template Wizards, no GAC'ing

Not long ago I posted about how to create a Project template for a Windows Service installer using Wix. In my humble opinion the project template made the task of creating a WIX setup project for a Windows Service easier. However, although easier there was still a need to do some manual editing of XML files.

Today I will show how we can extend a project template with a wizard as shown below and thus completely remove the required XML editing.


The Microsoft documentation can lead the unwary to believe that wizards in project templates require assemblies to be GAC'ed which isn't supported by VSIX files. Don't worry, a real wizard doesn't need mundane tools such as a GAC.


Image based on original by jdhancock

The Wizard

The MSDN article How to: Use Wizards with Project Templates describes some of the steps required to implement a project template wizard, but as we will see, don't believe all that MSDN tell you.

The first step is to create a Class Library assembly. This assembly should contain a class that implements the IWizard interface that is defined in the Microsoft.TemplateWizard namespace in the Microsoft.VisualStudio.TemplateWizardInterface assembly, and the GUI of your wizard.

For our Project Template the only method that we actually need to implement from the IWizard interface is the RunStarted method. All the others we will implement as empty methods.

The RunStarted method is called when you create a new project and this is the time that we will ask you what you want to put in your Project.wxs XML file. You will be presented with a simple dialog box where you are asked to fill in a form. Your answers will be used to create the WIX XML without you having to even open that XML file.
Here is what the method looks like when we have added the code to create the form and added the user response to the replacementsDictionary.


        public void RunStarted(object automationObject,
            Dictionary<string, string> replacementsDictionary,
            WizardRunKind runKind, object[] customParams)
        {
            try
            {
                // Display a form to the user. The form collects
                // input for the custom message.
                var inputForm = new UserInputForm(GetProjects(automationObject as DTE2));
                inputForm.ShowDialog();

                var projectInfo = new ProjectInfo(inputForm.Project);
                // Add custom parameters.
                replacementsDictionary.Add("$manufacturer$", inputForm.Manufacturer);
                replacementsDictionary.Add("$serviceExeName$", projectInfo.ServiceExeName);
                replacementsDictionary.Add("$servicePath$", projectInfo.ServicePath);
                replacementsDictionary.Add("$serviceName$", inputForm.ServiceName);
                replacementsDictionary.Add("$productName$", inputForm.ServiceName);
                replacementsDictionary.Add("$displayName$", inputForm.DisplayName);
                replacementsDictionary.Add("$description$", inputForm.ServiceDescription);
                replacementsDictionary.Add("$serviceControlName$", inputForm.ServiceControlName);

            }
            catch (Exception ex)
            {
                MessageBox.Show(ex.ToString());
            }
        }


        private IEnumerable<Project> GetProjects(DTE2 dte)
        {
            if (dte == null)
            {
                DisplayMessage("Failed to access the Visual Studios DTE object, can't get projects");
                return new List<Project>();
            }

            var solution = dte.Solution as Solution2;
            if (solution == null)
            {
                DisplayMessage("Failed to access the Solution of Visual Studios DTE object, can't get projects");
                return new List<Project>();
            }

            return solution.Projects.Cast<Project>();
        }


The replacementsDictionary is used to replace all the occurences of the given keys with the given values from the form.
The GetProjects method gets the list of existing projects in the current solution. This means that we can select the Windows Service project that we want to create are installer for from the existing projects in the solution. The implementation assumes a simple solution structure, if you are using something different you may have to adjust the resulting the path in the Product.wxs file to fit your solution.

The UI I have used is a regular Windows Form, but you should be able to use a WPF based UI as well.

The MSDN documentation says we need to sign the Wizard assembly, but it seems to work just fine without signing, and as we are not going to install the Wizard assembly into the GAC I don't see why we need to have a strong named assembly, so I have skipped that part.


Adding the Wizard To the Template

The MSDN article How to: Use Wizards with Project Templates states:
The assembly that implements IWizard must be signed with a strong name and installed into the global assembly cache.
This would be a real bummer if it was true, as VSIX doesn't support installing assemblies into the GAC and I try to avoid GAC'ing assemblies if I can since I think it often makes things more complicated than need be.
What to do when MSDN says: "No, you can't"? Then we of course turn the speakers volume on our laptop and play the theme song of the great British TV show Bob the Builder on Spotify, and listen to the Bob and his friends singing "Can we fix it? Yes we can!" while googling for a more positive answer than the MSDN one.

Bob the Builder image based on original by jdhancock
However I had some troubles finding a lot of information, except posts on various forums by Microsoft support employees repeating the same message, you have to put it in the GAC or in the IDE probing path (a folder in the Visual Studio installation). Luckily it turns out its quite easy to do it.

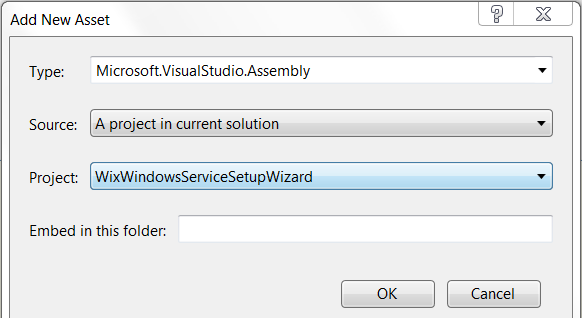
The first step is to go to the Assets tab of the vsixmanifest designer and add a reference to wizard assembly:


The next step is to edit the VSIX template which is inside the Project Template that we added when creating the VSIX project.
One way of doing it is to locate the project template zip file and open it in 7-zip, and select the .vstemplate file there and choose Edit.
The .vstemplate is an XML file and should look similar to this when we have edited it.


<VSTemplate Version="3.0.0" xmlns="http://schemas.microsoft.com/developer/vstemplate/2005" Type="Project">
  <TemplateData>
    <Name>Wix 3.6 Windows Service Setup Project</Name>
    <Description>Template to create a windows service setup project</Description>
    <ProjectType>WiX</ProjectType>
    <ProjectSubType>
    </ProjectSubType>
    <SortOrder>1000</SortOrder>
    <CreateNewFolder>true</CreateNewFolder>
    <DefaultName>WindowsServiceSetup</DefaultName>
    <ProvideDefaultName>true</ProvideDefaultName>
    <LocationField>Enabled</LocationField>
    <EnableLocationBrowseButton>true</EnableLocationBrowseButton>
    <Icon>WixProject.ico</Icon>
  </TemplateData>
  <TemplateContent>
    <Project TargetFileName="MyWindowsService.Setup.wixproj" File="MyWindowsService.Setup.wixproj" ReplaceParameters="true">
      <ProjectItem ReplaceParameters="true" TargetFileName="Product.wxs">Product.wxs</ProjectItem>
    </Project>
  </TemplateContent>
  <WizardExtension>
    <Assembly>WixWindowsServiceSetupWizard, Version=1.0.0.0, Culture=Neutral, PublicKeyToken=null</Assembly>
    <FullClassName>WixWindowsServiceSetupWizard.SetupWizard</FullClassName>
  </WizardExtension>
</VSTemplate>

The wizard assembly is hooked into the project template by adding a WizardExtension element containing an assembly reference to the assembly containing the class that implements the IWizard interface.

As you can see there is no PublicKeyToken (the assembly is not signed) and there is nothing in the GAC, but it seems to work anyway.

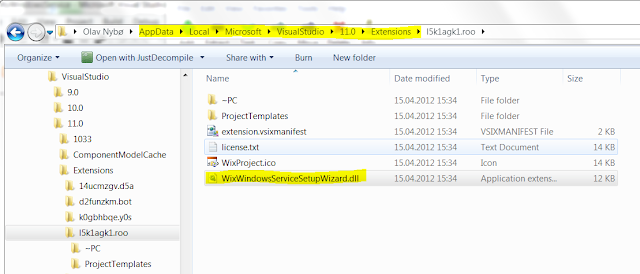
The wizard assembly is deployed to the extensions folder below the user app data folder


If we look at the extension.vsixmanifest we'll see that the assets we added in the designer above has been compiled into the following XML (and again, no signing here):


  <Assets>
    <Asset Type="Microsoft.VisualStudio.ProjectTemplate" Path="ProjectTemplates" />
    <Asset Type="Microsoft.VisualStudio.Assembly" Path="WixWindowsServiceSetupWizard.dll" AssemblyName="WixWindowsServiceSetupWizard, Version=1.0.0.0, Culture=neutral, PublicKeyToken=null" />
  </Assets>


I have updated the Wix Windows Service Setup Project Template on Visual Studio Gallery with the new Wizard solution.

Developing Visual Studio Project Wizards is a detailed although dated article on how to create a Project Wizard.
Walkthrough: Creating a Custom Action Project Item with an Item Template, Part 2 also has some interesting information even if it also talks about some SharePoint stuff.

Sunday, April 8, 2012

.NET Assembly Version Numbers

Version numbers on .NET assemblies are both simple and complicated stuff. This post will explain the details of the different version numbers on an assembly and what they are used for, then I will show how we can modify all of them on an existing assembly without access to the source code from which it was originally built.

The 3 .Net Assembly Version Numbers 

The simple story of version numbers is presented in the MSDN article Assembly Versioning.
  • The assembly's version number, which, together with the assembly name and culture information, is part of the assembly's identity. This number is used by the runtime to enforce version policy and plays a key part in the type resolution process at run time.
  • An informational version, which is a string that represents additional version information included for informational purposes only.
Ok, so an assembly has two version numbers, a real version number and a descriptive text thing, right?
Actually, no, it's not that simple.
Lets build a simple dll and look at the properties of the result in the file explorer:


File version and Product Version? Which is which?
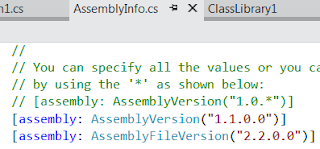
Lets have a look at the AssemblyInfo.cs file:


The AssemblyInfo.cs has two version attributes by default. The AssemblyVersion and the AssemblyFileVersion. Lets set these two numbers to 1.1.0.0 and 2.2.0.0 as shown above and lets see what happens to the ClassLibrary1.dll properties after we build.


We can now see that the File version is changed as expected, but the AssemblyVersion number isn't shown at all, we will get to that in a minute. There's a field called Product version, which has the same value as the File version. The Product version is the same version number as Microsoft refers to as Informational version in the Assembly Versioning article. The informational version is set to the File version if not set.
We can set the Product Version by adding a AssemblyInformationalVersion attribute to the AssemblyInfo.cs file.

If we build again we get the result as expected.


Now that we know how to set and check the last two version numbers, how do we check the most important one, the one that the .Net runtime uses when it determine to load the assembly or not, the Assembly Version?
Its clearly not in the dll properties dialog we can access from the Windows Explorer. We can read the assembly version programatically by using the following code:
Version version = AssemblyName.GetAssemblyName("MyAssembly.exe").Version

Reading Assembly Version Number using Powershell

Depending on what version you used to build the assembly and what version of Powershell you have installed you may be able to use the same method from Powershell.
I used Visual Studio 11 and .NET framework 4.5 when testing this, thus I had to download and install Powershell 3.0 to check my assembly. 
When you have the right Powershell version you can do:
       [Reflection.AssemblyName]::GetAssemblyName('full path to the assembly').Version
Which is essentially just the same as calling it from C# code as shown above.

Reading Assembly Version Number using a Decompiler

If you don't have the right Powershell version then probably the easiest way to get the assembly version number is to use a tool such as Telerik JustDecompile which also will present the assembly version.


For assemblies we are using in a Visual Studio solution the easiest way is of course to simply look at the properties of the referenced assembly.


Just Informational?

So we have 3 version numbers. As mentioned the Assembly Version and Product Version are described in the MSDN article Assembly Versioning. The File Version and the Assembly version are documented here.
If we combine the information from these two articles we get:
  1. Assembly Version - the real deal, the number that matters
  2. File Version - a number that can be used to tell the developer what version the should have been if we had upped the assembly version number
  3. Product Version - a text string that is just informational, doesn't even have to be a number at all.


However it turns out that the Product Version number isn't that free form after all as one could be lead to believe reading the MSDN documentation, at least not for all types of .NET applications.
I think that the Windows forms application team at Microsoft have had better days at work than the day they designed the System.Windows.Forms.Application class. This class has features that probably would be useful for console applications and others, while it at the same time has functionality that only makes sense in a Windows Forms application. A few warning signs that could indicate a need for a closer look at the Single Responsibility Principle.
Anyway this class also has a dependency on the Product Version string of the assembly, and remember, this is the version string that the MSDN says the following about :
The informational version is a string that attaches additional version information to an assembly for informational purposes only; this information is not used at run time.
Well this is simply not true for a Windows forms application.
Both the static properties UserAppDataPath and CommonAppDataPath that are used to get path to special folders are using the string stored in the Product Version property of the entry assembly.
Which means that should you decide to put any of the following characters in the version string '/ \ * ? < > |'  of your Windows forms application assembly you may quickly end up in trouble using the Application class.


.NET Framework 4.5 Version Numbering

Rick Strahl recently posted an article about the version numbers on the .NET 4.5 assemblies, and Scot Hanselman later posted another which in part responded to some of Ricks findings.
I think the fact that these .NET Masters don't immediately agree on such a seemingly simple thing as version numbers of the assemblies should tell us something about the real simplicity of the matter.
Reading Hanselman's post it looks as things aren't as bad as one could think when reading Strahl's post, but I do think Microsoft could have made things easier for us. As the Product Version number isn't supposed to be used for anything, why not put the 4.5 number there?
Then it would have been so easy to see that this is in fact a 4.5 assembly. On the other hand, when we see what Microsoft has done in the Window forms example just mentioned, who knows what else is dependent on that Product Version, even if it is not supposed to be in use by the .NET Framework.


Hacking assembly version numbers using ILDASM and ILASM
Quite recently I found myself in a situation where I had an application that was configured to load a plugin written by someone else. The author of the plugin had messed up the version number of the plugin he gave me and he didn't have time to fix it. The application refused to load the plugin, and I couldn't reconfigure it so I thought I just had to wait for a new plugin. Then it hit me that this version number have to be stored in the assembly somewhere and  it should be possible to change it, and in fact it is very possible to change all three version numbers of an assembly.

Ildasm.exe

Ildasm is the MSIL Disassembler which can read assembly files and turn them into a somewhat human readable text file + a .res file containing assembly resources.
The cool thing is that we can edit these two files and change the version numbers, then we can re-assemble the dll using Ilasm on these to files and getting a dll file again.

To dissamble the dll simply start the ildasm.exe <dll name>.
When the IL DASM application has started we can dump the contents of the assembly to two files by pressing ctrl-d and then check all boxes in the Dump options dialog that pops up.


Name the result in the save dialog that follows and then we get two files with the extensions .il and .res.
Both files can be edited in Visual Studio.


Changing the Assembly Version

To change the assembly version we open the .il file and search for a piece of il code that starts with .assembly followed by a comment and then the assembly name.
It will look similar to this:
.assembly /*20000001*/ ClassLibrary1
{
....
....
....   
  .hash algorithm 0x00008004
  .ver 3:3:0:0
}

The assembly version number is changed by simply editing the string after .ver and then save the .il file.


Changing the File version and Product version

Both the File and Production version can be changed by editing the .res file in Visual Studio 11.
If you open the .res file it will look similar to this:


Double-click the 1 [Neutral] node to open the resource editor

Change the Fileversion in the upper part. Notice that the PRODUCTVERSION is shown as 0.0.0.0 in the upper part because it is not a number. Edit the ProductVersion shown in the bottom to change it as text.

Save the .res file.


Create the modified assembly from the .il file and the .res file

To build a new assembly from the modified .il file and the modified .res file open a Developer Command Prompt as shown:

Execute: ilasm /resource:<resource file> /dll <il file>.
And we have changed the version numbers of our assembly file.

Monday, April 2, 2012

Creating a Wix Windows Service installer project template for Visual Studio 11

When I wrote my first blog post about creating a wix web service installer I promised I would look into how to make a Visual Studio project template out of it.
I won't do that today. I will start out simple and create a project template for making windows service projects with Wix and Visual Studio 11.
Creating Wix Windows Service installers using the standard Wix Setup Project template isn't exactly rocket science, but you still need to remember what XML you have to put into your Product.wxs file.
I am not the kind of guy who can remember these things and I hate having to google around for such things when I just want to quickly make a very basic installer for my Windows Service. Most of the time I just want an installer that installs the thing, with no options or anything, but I am required to have an installer. As long as I can produce a MSI file that installs it, everyone is happy.

So I want a project template that lets me say, I want my installer, and preferably that's it. I haven't got quite there yet, but I have a template that lets me say, I want my installer, and then it will ask me to fill in the '*' marked fields, which I think is a lot easier than the generic Wix Setup Project template that gives me no hint as to what I need to do to make a Windows Service Installer.

Creating a Visual Studio Project Template

First you should download and install Visual Studio 11 beta SDK.
Microsoft provides pretty good description on how to How to: Create Project Templates and then Creating Extensions By Using the VSIX Project Template, the latter doesn't seem to be 100% accurate at the moment, but I guess that is as expected considering it is a beta version.

I started out creating a setup project using the Wix 3.6 Setup Project template. This creates a project containing mainly a Product.wxs file.
I changed this to a generic Product.wxs file that will create a Windows Service Installer once the required fields has been filled in (the fields marked in yellow starting with <*Insert>):

Produc.wxs

When the project is as we want it, we export it as a template by going to the file menu and select "Export template..."
Export Template Wizard

Select "Project template" and the project you want to use for your template.
You will now get a zip file in %USERPROFILE%\My Documents\Visual Studio 11\My Exported Templates\

This zip file can then be used when we create our vsix file.

Add new project and select a VSIX project.


Then you will be presented with the following dialog which should be filled in something like this:

Then switch to Assets tab and add the zip file you built earlier.
Then hit build and you have your vsix file.

This vsix can then be uploaded to visual studio gallery if you want, I have uploaded mine here: http://visualstudiogallery.msdn.microsoft.com/7f35c8ce-1763-4340-b720-ab2d359009c5

The promised template for Web Service installers will follow soon....