Sunday, April 15, 2012

Visual Studio 11 Project Template Wizards, no GAC'ing

Not long ago I posted about how to create a Project template for a Windows Service installer using Wix. In my humble opinion the project template made the task of creating a WIX setup project for a Windows Service easier. However, although easier there was still a need to do some manual editing of XML files.

Today I will show how we can extend a project template with a wizard as shown below and thus completely remove the required XML editing.


The Microsoft documentation can lead the unwary to believe that wizards in project templates require assemblies to be GAC'ed which isn't supported by VSIX files. Don't worry, a real wizard doesn't need mundane tools such as a GAC.


Image based on original by jdhancock

The Wizard

The MSDN article How to: Use Wizards with Project Templates describes some of the steps required to implement a project template wizard, but as we will see, don't believe all that MSDN tell you.

The first step is to create a Class Library assembly. This assembly should contain a class that implements the IWizard interface that is defined in the Microsoft.TemplateWizard namespace in the Microsoft.VisualStudio.TemplateWizardInterface assembly, and the GUI of your wizard.

For our Project Template the only method that we actually need to implement from the IWizard interface is the RunStarted method. All the others we will implement as empty methods.

The RunStarted method is called when you create a new project and this is the time that we will ask you what you want to put in your Project.wxs XML file. You will be presented with a simple dialog box where you are asked to fill in a form. Your answers will be used to create the WIX XML without you having to even open that XML file.
Here is what the method looks like when we have added the code to create the form and added the user response to the replacementsDictionary.


        public void RunStarted(object automationObject,
            Dictionary<string, string> replacementsDictionary,
            WizardRunKind runKind, object[] customParams)
        {
            try
            {
                // Display a form to the user. The form collects
                // input for the custom message.
                var inputForm = new UserInputForm(GetProjects(automationObject as DTE2));
                inputForm.ShowDialog();

                var projectInfo = new ProjectInfo(inputForm.Project);
                // Add custom parameters.
                replacementsDictionary.Add("$manufacturer$", inputForm.Manufacturer);
                replacementsDictionary.Add("$serviceExeName$", projectInfo.ServiceExeName);
                replacementsDictionary.Add("$servicePath$", projectInfo.ServicePath);
                replacementsDictionary.Add("$serviceName$", inputForm.ServiceName);
                replacementsDictionary.Add("$productName$", inputForm.ServiceName);
                replacementsDictionary.Add("$displayName$", inputForm.DisplayName);
                replacementsDictionary.Add("$description$", inputForm.ServiceDescription);
                replacementsDictionary.Add("$serviceControlName$", inputForm.ServiceControlName);

            }
            catch (Exception ex)
            {
                MessageBox.Show(ex.ToString());
            }
        }


        private IEnumerable<Project> GetProjects(DTE2 dte)
        {
            if (dte == null)
            {
                DisplayMessage("Failed to access the Visual Studios DTE object, can't get projects");
                return new List<Project>();
            }

            var solution = dte.Solution as Solution2;
            if (solution == null)
            {
                DisplayMessage("Failed to access the Solution of Visual Studios DTE object, can't get projects");
                return new List<Project>();
            }

            return solution.Projects.Cast<Project>();
        }


The replacementsDictionary is used to replace all the occurences of the given keys with the given values from the form.
The GetProjects method gets the list of existing projects in the current solution. This means that we can select the Windows Service project that we want to create are installer for from the existing projects in the solution. The implementation assumes a simple solution structure, if you are using something different you may have to adjust the resulting the path in the Product.wxs file to fit your solution.

The UI I have used is a regular Windows Form, but you should be able to use a WPF based UI as well.

The MSDN documentation says we need to sign the Wizard assembly, but it seems to work just fine without signing, and as we are not going to install the Wizard assembly into the GAC I don't see why we need to have a strong named assembly, so I have skipped that part.


Adding the Wizard To the Template

The MSDN article How to: Use Wizards with Project Templates states:
The assembly that implements IWizard must be signed with a strong name and installed into the global assembly cache.
This would be a real bummer if it was true, as VSIX doesn't support installing assemblies into the GAC and I try to avoid GAC'ing assemblies if I can since I think it often makes things more complicated than need be.
What to do when MSDN says: "No, you can't"? Then we of course turn the speakers volume on our laptop and play the theme song of the great British TV show Bob the Builder on Spotify, and listen to the Bob and his friends singing "Can we fix it? Yes we can!" while googling for a more positive answer than the MSDN one.

Bob the Builder image based on original by jdhancock
However I had some troubles finding a lot of information, except posts on various forums by Microsoft support employees repeating the same message, you have to put it in the GAC or in the IDE probing path (a folder in the Visual Studio installation). Luckily it turns out its quite easy to do it.

The first step is to go to the Assets tab of the vsixmanifest designer and add a reference to wizard assembly:
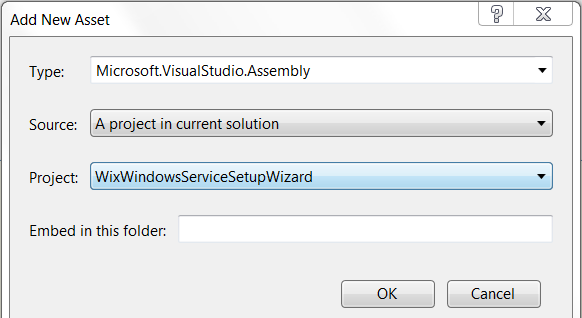

The next step is to edit the VSIX template which is inside the Project Template that we added when creating the VSIX project.
One way of doing it is to locate the project template zip file and open it in 7-zip, and select the .vstemplate file there and choose Edit.
The .vstemplate is an XML file and should look similar to this when we have edited it.


<VSTemplate Version="3.0.0" xmlns="http://schemas.microsoft.com/developer/vstemplate/2005" Type="Project">
  <TemplateData>
    <Name>Wix 3.6 Windows Service Setup Project</Name>
    <Description>Template to create a windows service setup project</Description>
    <ProjectType>WiX</ProjectType>
    <ProjectSubType>
    </ProjectSubType>
    <SortOrder>1000</SortOrder>
    <CreateNewFolder>true</CreateNewFolder>
    <DefaultName>WindowsServiceSetup</DefaultName>
    <ProvideDefaultName>true</ProvideDefaultName>
    <LocationField>Enabled</LocationField>
    <EnableLocationBrowseButton>true</EnableLocationBrowseButton>
    <Icon>WixProject.ico</Icon>
  </TemplateData>
  <TemplateContent>
    <Project TargetFileName="MyWindowsService.Setup.wixproj" File="MyWindowsService.Setup.wixproj" ReplaceParameters="true">
      <ProjectItem ReplaceParameters="true" TargetFileName="Product.wxs">Product.wxs</ProjectItem>
    </Project>
  </TemplateContent>
  <WizardExtension>
    <Assembly>WixWindowsServiceSetupWizard, Version=1.0.0.0, Culture=Neutral, PublicKeyToken=null</Assembly>
    <FullClassName>WixWindowsServiceSetupWizard.SetupWizard</FullClassName>
  </WizardExtension>
</VSTemplate>

The wizard assembly is hooked into the project template by adding a WizardExtension element containing an assembly reference to the assembly containing the class that implements the IWizard interface.

As you can see there is no PublicKeyToken (the assembly is not signed) and there is nothing in the GAC, but it seems to work anyway.

The wizard assembly is deployed to the extensions folder below the user app data folder
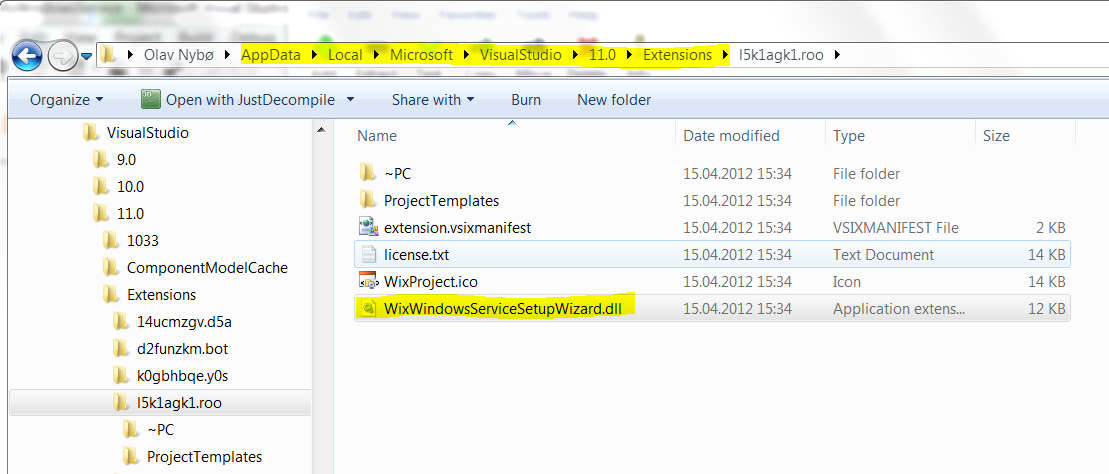


If we look at the extension.vsixmanifest we'll see that the assets we added in the designer above has been compiled into the following XML (and again, no signing here):


  <Assets>
    <Asset Type="Microsoft.VisualStudio.ProjectTemplate" Path="ProjectTemplates" />
    <Asset Type="Microsoft.VisualStudio.Assembly" Path="WixWindowsServiceSetupWizard.dll" AssemblyName="WixWindowsServiceSetupWizard, Version=1.0.0.0, Culture=neutral, PublicKeyToken=null" />
  </Assets>


I have updated the Wix Windows Service Setup Project Template on Visual Studio Gallery with the new Wizard solution.

Developing Visual Studio Project Wizards is a detailed although dated article on how to create a Project Wizard.
Walkthrough: Creating a Custom Action Project Item with an Item Template, Part 2 also has some interesting information even if it also talks about some SharePoint stuff.

Sunday, April 8, 2012

.NET Assembly Version Numbers

Version numbers on .NET assemblies are both simple and complicated stuff. This post will explain the details of the different version numbers on an assembly and what they are used for, then I will show how we can modify all of them on an existing assembly without access to the source code from which it was originally built.

The 3 .Net Assembly Version Numbers 

The simple story of version numbers is presented in the MSDN article Assembly Versioning.
  • The assembly's version number, which, together with the assembly name and culture information, is part of the assembly's identity. This number is used by the runtime to enforce version policy and plays a key part in the type resolution process at run time.
  • An informational version, which is a string that represents additional version information included for informational purposes only.
Ok, so an assembly has two version numbers, a real version number and a descriptive text thing, right?
Actually, no, it's not that simple.
Lets build a simple dll and look at the properties of the result in the file explorer:


File version and Product Version? Which is which?
Lets have a look at the AssemblyInfo.cs file:


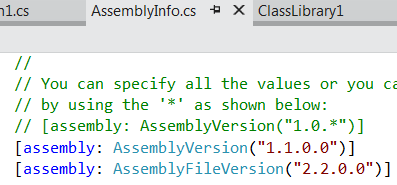
The AssemblyInfo.cs has two version attributes by default. The AssemblyVersion and the AssemblyFileVersion. Lets set these two numbers to 1.1.0.0 and 2.2.0.0 as shown above and lets see what happens to the ClassLibrary1.dll properties after we build.


We can now see that the File version is changed as expected, but the AssemblyVersion number isn't shown at all, we will get to that in a minute. There's a field called Product version, which has the same value as the File version. The Product version is the same version number as Microsoft refers to as Informational version in the Assembly Versioning article. The informational version is set to the File version if not set.
We can set the Product Version by adding a AssemblyInformationalVersion attribute to the AssemblyInfo.cs file.

If we build again we get the result as expected.


Now that we know how to set and check the last two version numbers, how do we check the most important one, the one that the .Net runtime uses when it determine to load the assembly or not, the Assembly Version?
Its clearly not in the dll properties dialog we can access from the Windows Explorer. We can read the assembly version programatically by using the following code:
Version version = AssemblyName.GetAssemblyName("MyAssembly.exe").Version

Reading Assembly Version Number using Powershell

Depending on what version you used to build the assembly and what version of Powershell you have installed you may be able to use the same method from Powershell.
I used Visual Studio 11 and .NET framework 4.5 when testing this, thus I had to download and install Powershell 3.0 to check my assembly. 
When you have the right Powershell version you can do:
       [Reflection.AssemblyName]::GetAssemblyName('full path to the assembly').Version
Which is essentially just the same as calling it from C# code as shown above.

Reading Assembly Version Number using a Decompiler

If you don't have the right Powershell version then probably the easiest way to get the assembly version number is to use a tool such as Telerik JustDecompile which also will present the assembly version.


For assemblies we are using in a Visual Studio solution the easiest way is of course to simply look at the properties of the referenced assembly.


Just Informational?

So we have 3 version numbers. As mentioned the Assembly Version and Product Version are described in the MSDN article Assembly Versioning. The File Version and the Assembly version are documented here.
If we combine the information from these two articles we get:
  1. Assembly Version - the real deal, the number that matters
  2. File Version - a number that can be used to tell the developer what version the should have been if we had upped the assembly version number
  3. Product Version - a text string that is just informational, doesn't even have to be a number at all.


However it turns out that the Product Version number isn't that free form after all as one could be lead to believe reading the MSDN documentation, at least not for all types of .NET applications.
I think that the Windows forms application team at Microsoft have had better days at work than the day they designed the System.Windows.Forms.Application class. This class has features that probably would be useful for console applications and others, while it at the same time has functionality that only makes sense in a Windows Forms application. A few warning signs that could indicate a need for a closer look at the Single Responsibility Principle.
Anyway this class also has a dependency on the Product Version string of the assembly, and remember, this is the version string that the MSDN says the following about :
The informational version is a string that attaches additional version information to an assembly for informational purposes only; this information is not used at run time.
Well this is simply not true for a Windows forms application.
Both the static properties UserAppDataPath and CommonAppDataPath that are used to get path to special folders are using the string stored in the Product Version property of the entry assembly.
Which means that should you decide to put any of the following characters in the version string '/ \ * ? < > |'  of your Windows forms application assembly you may quickly end up in trouble using the Application class.


.NET Framework 4.5 Version Numbering

Rick Strahl recently posted an article about the version numbers on the .NET 4.5 assemblies, and Scot Hanselman later posted another which in part responded to some of Ricks findings.
I think the fact that these .NET Masters don't immediately agree on such a seemingly simple thing as version numbers of the assemblies should tell us something about the real simplicity of the matter.
Reading Hanselman's post it looks as things aren't as bad as one could think when reading Strahl's post, but I do think Microsoft could have made things easier for us. As the Product Version number isn't supposed to be used for anything, why not put the 4.5 number there?
Then it would have been so easy to see that this is in fact a 4.5 assembly. On the other hand, when we see what Microsoft has done in the Window forms example just mentioned, who knows what else is dependent on that Product Version, even if it is not supposed to be in use by the .NET Framework.


Hacking assembly version numbers using ILDASM and ILASM
Quite recently I found myself in a situation where I had an application that was configured to load a plugin written by someone else. The author of the plugin had messed up the version number of the plugin he gave me and he didn't have time to fix it. The application refused to load the plugin, and I couldn't reconfigure it so I thought I just had to wait for a new plugin. Then it hit me that this version number have to be stored in the assembly somewhere and  it should be possible to change it, and in fact it is very possible to change all three version numbers of an assembly.

Ildasm.exe

Ildasm is the MSIL Disassembler which can read assembly files and turn them into a somewhat human readable text file + a .res file containing assembly resources.
The cool thing is that we can edit these two files and change the version numbers, then we can re-assemble the dll using Ilasm on these to files and getting a dll file again.

To dissamble the dll simply start the ildasm.exe <dll name>.
When the IL DASM application has started we can dump the contents of the assembly to two files by pressing ctrl-d and then check all boxes in the Dump options dialog that pops up.


Name the result in the save dialog that follows and then we get two files with the extensions .il and .res.
Both files can be edited in Visual Studio.


Changing the Assembly Version

To change the assembly version we open the .il file and search for a piece of il code that starts with .assembly followed by a comment and then the assembly name.
It will look similar to this:
.assembly /*20000001*/ ClassLibrary1
{
....
....
....   
  .hash algorithm 0x00008004
  .ver 3:3:0:0
}

The assembly version number is changed by simply editing the string after .ver and then save the .il file.


Changing the File version and Product version

Both the File and Production version can be changed by editing the .res file in Visual Studio 11.
If you open the .res file it will look similar to this:


Double-click the 1 [Neutral] node to open the resource editor

Change the Fileversion in the upper part. Notice that the PRODUCTVERSION is shown as 0.0.0.0 in the upper part because it is not a number. Edit the ProductVersion shown in the bottom to change it as text.

Save the .res file.


Create the modified assembly from the .il file and the .res file

To build a new assembly from the modified .il file and the modified .res file open a Developer Command Prompt as shown:

Execute: ilasm /resource:<resource file> /dll <il file>.
And we have changed the version numbers of our assembly file.

Monday, April 2, 2012

Creating a Wix Windows Service installer project template for Visual Studio 11

When I wrote my first blog post about creating a wix web service installer I promised I would look into how to make a Visual Studio project template out of it.
I won't do that today. I will start out simple and create a project template for making windows service projects with Wix and Visual Studio 11.
Creating Wix Windows Service installers using the standard Wix Setup Project template isn't exactly rocket science, but you still need to remember what XML you have to put into your Product.wxs file.
I am not the kind of guy who can remember these things and I hate having to google around for such things when I just want to quickly make a very basic installer for my Windows Service. Most of the time I just want an installer that installs the thing, with no options or anything, but I am required to have an installer. As long as I can produce a MSI file that installs it, everyone is happy.

So I want a project template that lets me say, I want my installer, and preferably that's it. I haven't got quite there yet, but I have a template that lets me say, I want my installer, and then it will ask me to fill in the '*' marked fields, which I think is a lot easier than the generic Wix Setup Project template that gives me no hint as to what I need to do to make a Windows Service Installer.

Creating a Visual Studio Project Template

First you should download and install Visual Studio 11 beta SDK.
Microsoft provides pretty good description on how to How to: Create Project Templates and then Creating Extensions By Using the VSIX Project Template, the latter doesn't seem to be 100% accurate at the moment, but I guess that is as expected considering it is a beta version.

I started out creating a setup project using the Wix 3.6 Setup Project template. This creates a project containing mainly a Product.wxs file.
I changed this to a generic Product.wxs file that will create a Windows Service Installer once the required fields has been filled in (the fields marked in yellow starting with <*Insert>):

Produc.wxs

When the project is as we want it, we export it as a template by going to the file menu and select "Export template..."
Export Template Wizard

Select "Project template" and the project you want to use for your template.
You will now get a zip file in %USERPROFILE%\My Documents\Visual Studio 11\My Exported Templates\

This zip file can then be used when we create our vsix file.

Add new project and select a VSIX project.


Then you will be presented with the following dialog which should be filled in something like this:

Then switch to Assets tab and add the zip file you built earlier.
Then hit build and you have your vsix file.

This vsix can then be uploaded to visual studio gallery if you want, I have uploaded mine here: http://visualstudiogallery.msdn.microsoft.com/7f35c8ce-1763-4340-b720-ab2d359009c5

The promised template for Web Service installers will follow soon....

Friday, March 30, 2012

The Stable Dependencies Principle (SDP) and nDepend

Latin used to be the universal academic language and this probably why Latin is still in use in classical academic disciplines such as law and medicine. Particularly in medicine, even the simplest texts appears as complete gibberish to the uninitiated.
Computer science on the other is a rather young academic discipline. This is probably a reason why we don't have to deal with old luggage such as learning some old language such as Latin to learn the field.
At least this was the case until about 1994 when Robert C. Martin of Object Mentor introduced three design quality metrics in his paper OO Design Quality Metrics and when doing this decided that it was time to have some Latin in computer science as well.
  • Ca : Afferent Couplings : The number of classes outside this component that depend upon classes within this component
  • Ce : Efferent Couplings : The number of classes inside this component that depend upon classes outside this component
  • I : Instability : (Ce ÷ (Ca+Ce)) : This metric has the range [0,1].  I=0  indicates a maximally stable category.  I=1 indicates a maximally instable component.
Actually in his original paper he talked about categories, referring to Grady Booch, but he has later repeated the same metrics for components


Is the ferry coming or is it leaving?

Instability is regular english, but "Afferent and Efferent Couplings"? I can easily remember that its about incoming and outgoing couplings, but I suppose incoming and outgoing would have been to simple.
If you try to google them you will see that the most common use of afferent and efferent are as medical terms. Wikipedia defines afferent as: "Afferent is an anatomical term" and "Efferent is an anatomical term". Same story at dictionary.reference.com, no references to classes and dependencies, just medicine and anatomy.


Well as I said, doctors are used to this Latin business, I am not, but I try to remember which is which by trying to remember the little Latin I do know and what these two words are composed of.
Afferent is ad- + ferre and efferent is ex- + ferre, which means roughly something along the lines of "carry to" and "carry away from". There obviously is some rule in latin that ad- before an f, becomes af-, and ex- before an f becomes ef-.
The origins of the word ferry is also ferre.
So we only have to remember that Af- is Ad-, and then we have to know that Ad means towards.

Ad-ferre - the ferry is coming


We have afferent coupling when the direction of the dependencies is going inwards, or towards our component.

Ex-ferre - the ferry is leaving, exiting the port


If we also can remember that Ef- really is Ex-, and Ex- mean "out of", we have got it. I always think of Exodus or Exit when trying to remember the meaning of Ex.

We have efferent couplings when the direction of the dependencies is going away from our component. When we are depending on something.


The Main Sequence and the Stable-Abstraction Principle (SAP)

So now that we remember what Ce, Ca and I means we can go on to the next step and look into what we can do once we know how to calculate the Instability of a component and what it means.
Well actually I have only mentioned that the Instability is related to afferent and efferent couplings, but the general idea is that this Instability number tells us something about how hard it is to change the component.

This is not to say that every component should be hard nor that all should be easy to change.
Martin writes in his 1994 paper about the main sequence, and he later refines this into the Stable-Abstraction Principle which states:
A component should be as abstract at it is stable

Although possible it is not practical to count and calculate these numbers as we are writing our code. Fortunately tools such as nDepend exist to do this job for us.

nDepend can be downloaded free of charge for use in Open Source projects and trial version is available for commercial use.

To check where your code is with respect to the Stable-Abstraction Principle and a lot of other metrics, download nDepend and start it. Then go File->New Project


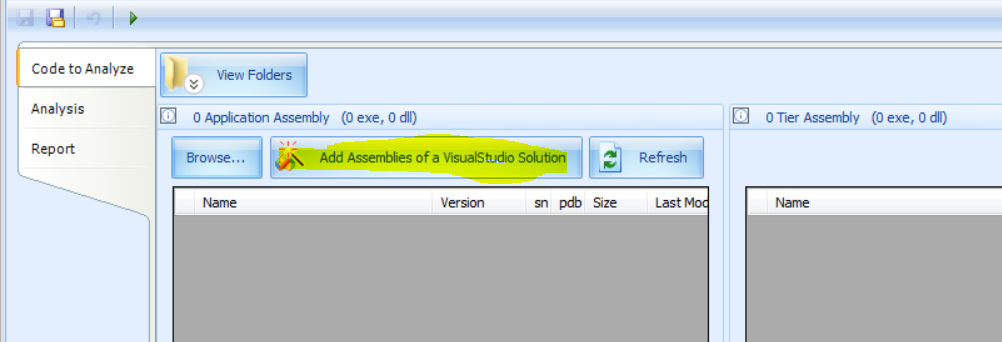
Then add the assemblies you want to analyze, the easiest option is to simply select a Visual Studio solution and nDepend will locate the assemblies for you.

After you have selected the assemblies, simply hit F5 and nDepend will generate a detailed report for you which among a lot of details contains a diagram which is called "Assemblies Abstractness vs. Instability" which is exactly the same as Martins main sequence diagrams.

The Stable Dependencies Principle (SDP)

In a later article on Stability Martin introduces the Stable Dependencies Principle:

THE DEPENDENCIES BETWEEN PACKAGES IN A DESIGN SHOULD
BE IN THE DIRECTION OF THE STABILITY OF THE PACKAGES. A 
PACKAGE SHOULD ONLY DEPEND UPON PACKAGES THAT ARE
MORE STABLE THAT IT IS.

In other words the components we depend on should be harder to change than the component we are working on. We want to reduce the likelihood of needing to change our component because one of our dependencies change.
So we should check our code for this as well, this is supposed to be something that nDepend will tell us directly out-of-the-box, at least this is what the nDepend documentation says, but I haven't been able to find it.
Anyway there are ways that we can tailor the information that nDepend does provide exactly as we want.
nDepend provides us with a query language called CQL that we can use to get information about our code. It is in a syntax that bears some resemblance to SQL, but just don't be fooled into believing it is SQL, it can do a lot, but not nearly as much as you can do with data and SQL. 
If the standard report doesn't tell you what you are looking for, there are a lot of other pre-made queries you can run and you can write your own.

To get a list of the Instability values (I) of all your assemblies you can run the following CQL:
// <Name>Olavs Instability of assemblies</Name>
WARN IF Count > 0 IN SELECT ASSEMBLIES ORDER BY Instability ASC


What we can make use of is that nDepend will output a number of XML files when it is run and we can run it from the command.
So when we have made a nDepend project, added the solution (assemblies) and added the above CQL query, then nDepend will produce XML files that we can use to do a Stable Dependencies Principle check ourselves.
To run from the command line:
Start a command prompt in the folder where nDepend is installed and execute: nDepend.Console.exe <path to the ndepend project file>

The XML output files will be in a folder called NDependOut in the same folder as the nDepend project file.
The two we are interested in are AssembliesDependencies.xml and CQLResult.xml:


The AssembliesDependencies.xml lists for each assembly the assemblies the assembly depends on and all the assemblies that depends on the assembly.
This is an example of a part of an AssembliesDependencies.xml file:

  <Dependencies_For Assembly="MyProject.UI v1.0.0.0">
    <DependsOn>
      <DependsOn_Name>mscorlib v4.0.0.0</DependsOn_Name>
      <DependsOn_Name>System.Web v4.0.0.0</DependsOn_Name>
      <DependsOn_Name>System v4.0.0.0</DependsOn_Name>
      <DependsOn_Name>MyProject.Domain v1.0.0.0</DependsOn_Name>
      <DependsOn_Name>MyProject.Service.DataContracts v1.0.0.0</DependsOn_Name>
      <DependsOn_Name>System.Web.Abstractions v4.0.0.0</DependsOn_Name>
      <DependsOn_Name>System.ServiceModel v4.0.0.0</DependsOn_Name>
      <DependsOn_Name>System.Configuration v4.0.0.0</DependsOn_Name>
      <DependsOn_Name>MyProject.Mapping v1.0.0.0</DependsOn_Name>
      <DependsOn_Name>MyProject.Services.DataContracts v1.0.0.0</DependsOn_Name>
      <DependsOn_Name>MyProject.Preview.Model v1.0.0.0</DependsOn_Name>
      <DependsOn_Name>System.Core v4.0.0.0</DependsOn_Name>
      <DependsOn_Name>MyProject.Services.ServiceContracts v1.0.0.0</DependsOn_Name>
      <DependsOn_Name>System.Web.Extensions v4.0.0.0</DependsOn_Name>
    </DependsOn>
    <ReferencedBy>
      <ReferencedBy_Name>MyProject.Web v1.0.0.0</ReferencedBy_Name>
      <ReferencedBy_Name>MyProject.CalculationService v1.0.0.0</ReferencedBy_Name>
    </ReferencedBy>
  </Dependencies_For>
  <Dependencies_For Assembly="MyProject.Web v1.0.0.0">
    <DependsOn>
      <DependsOn_Name>MyProject.UI v1.0.0.0</DependsOn_Name>
      <DependsOn_Name>MyProject.Domain v1.0.0.0</DependsOn_Name>
      <DependsOn_Name>MyProject.Mapping v1.0.0.0</DependsOn_Name>
      <DependsOn_Name>System.Web v4.0.0.0</DependsOn_Name>
      <DependsOn_Name>mscorlib v4.0.0.0</DependsOn_Name>
      <DependsOn_Name>System v4.0.0.0</DependsOn_Name>
      <DependsOn_Name>MyProject.Service.DataContracts v1.0.0.0</DependsOn_Name>
      <DependsOn_Name>System.Web.Extensions v4.0.0.0</DependsOn_Name>
      <DependsOn_Name>System.Core v4.0.0.0</DependsOn_Name>
      <DependsOn_Name>System.ServiceModel v4.0.0.0</DependsOn_Name> 

The other file that we are interested in is the CQLResult.xml file. If you remember that we added a query for the Instabilities of assemblies and that we named it: "Olavs Instabilities.....". The result of this query will now appear in the CQLResult.xml file. There will be a lot of other results as well, but we can search for our query  by the name we gave it in the comment of the query.
This is an example of the "Olavs Instabilities of assemblies" section:

    <Query Status="Warn" Name="Olavs Instability of assemblies" NbNodeMatched="33" NbNodeTested="33" SelectionViewFileName="SelectionView_-266889740.png" KindOfNode=" assemblies">
      <QueryHtml>&lt;font color='#008000'&gt;//&amp;#0160;&amp;lt;Name&amp;gt;&lt;/font&gt;&lt;b style="color:#008000;background-color:#E6FFE6"&gt;Olavs&amp;#0160;Instability&amp;#0160;of&amp;#0160;assemblies&lt;/b&gt;&lt;font color='#008000'&gt;&amp;lt;/Name&amp;gt;&lt;br/&gt;&lt;/font&gt;&lt;font color='#0000FF'&gt;WARN&lt;/font&gt;&amp;#0160;&lt;font color='#0000FF'&gt;IF&lt;/font&gt;&amp;#0160;&lt;font color='#000064'&gt;Count&lt;/font&gt;&amp;#0160;&lt;font color='#000000'&gt;&amp;gt;&lt;/font&gt;&amp;#0160;&lt;b style="color:#000000;background-color:#FFFF99"&gt;0&lt;/b&gt;&amp;#0160;&lt;font color='#0000FF'&gt;IN&lt;/font&gt;&amp;#0160;&lt;font color='#0000FF'&gt;SELECT&lt;/font&gt;&amp;#0160;&lt;font color='#0000FF'&gt;ASSEMBLIES&lt;/font&gt;&amp;#0160;&lt;font color='#0000FF'&gt;ORDER&lt;/font&gt;&amp;#0160;&lt;font color='#0000FF'&gt;BY&lt;/font&gt;&amp;#0160;&lt;font color='#000064'&gt;Instability&lt;/font&gt;&amp;#0160;&lt;font color='#0000FF'&gt;ASC&lt;/font&gt;</QueryHtml>
      <Columns>
        <Column>assemblies</Column>
        <Column>Instability</Column>
      </Columns>
      <Rows>
        <Row Name="System.ServiceModel" FullName="System.ServiceModel">
          <Val>N/A</Val>
        </Row>
        <Row Name="System.Web.Abstractions" FullName="System.Web.Abstractions">
          <Val>N/A</Val>
        </Row>
        <Row Name="MyProject.Domain" FullName="MyProjectDK.DealerPortal.Domain">
          <Val>0.21081</Val>
        </Row>
        <Row Name="MyProject.CalculationService.Data" FullName="MyProjectDK.DealerPortal.CalculationService.Data">
          <Val>0.66667</Val>
        </Row>
        <Row Name="MyProject.Mapping" FullName="MyProjectDK.DealerPortal.Mapping">
          <Val>0.71875</Val>
        </Row>
        <Row Name="MyProject.Service.DataContracts" FullName="MyProjectDK.DealerPortal.Service.DataContracts">
          <Val>0.78723</Val>
        </Row>
        <Row Name="MyProject.UI" FullName="MyProjectDK.DealerPortal.UI">
          <Val>0.7907</Val>
        </Row>
        <Row Name="MyProject.Repositories" FullName="MyProjectDK.DealerPortal.Repositories">
          <Val>0.96296</Val>
        </Row>
        <Row Name="MyProject.Preview.Model" FullName="MyProjectDK.DealerPortal.Preview.Model">
          <Val>0.96907</Val>
        </Row>

So now we have two lists (xml files), the first one has all the dependency information for the assemblies and the second has the calculated Instability values for each of the assemblies.

Now we only have to combine these two lists to check if we have any assemblies that breaks the Stable dependencies principle.
I have written a small console application that will do just this. The source code for it is available at  https://spdchecker.codeplex.com/
The application is exuted from a command prompt as this: 
                        SPDChecker <path to CQLResult.xml> <path to AssembliesDependencies.xml>

And the result looks something like this:


Should you try it and should it find something in your assemblies, please be advised that even if my warning text may indicate that this is a major crisis, remember what Robert C. Martin himself wrote about his metrics:
However, a metric is not a god; it is merely a measurement against an arbitrary standard.  It is certainly possible that the standard chosen in this paper is appropriate only for certain applications and is not appropriate for others.  It may also be that there are far better metrics that can be used to measure the quality of a design. 
Thus, I would deeply regret it if anybody suddenly decided that all their designs must unconditionally be conformant to “The Martin Metrics”.  I hope that designers will experiment with them, find out what is good and what is bad about them, and then communicate their findings to the rest of us.
I agree 100% with Mr. Martin on this.
ad-
ex-
efferent
afferent
http://www.objectmentor.com/resources/articles/stability.pdf
http://www.objectmentor.com/resources/articles/oodmetrc.pdf
http://www.ndepend.com/NDependDownload.aspx
There is also a very good explanation of these two principles (SDP/SAP) in Robert C. Martins book: "Agile Principles, Patterns and Practices in C#", Prentice Hall, pages 426-435


Tuesday, March 27, 2012

Binding the View and ViewModel in a Windows Phone 7 app

I have wanted to start developing apps for Windows Phone 7 for a long time, but never gotten around to actually do it. So when a former colleague of mine started a blog series about Creating a reusable base for WP7 apps on his company blog I thought this was a great opportunity to get started. The author, Yngve Bakken Nilsen is one of the best web-developers I have ever worked with, so my expectations to this series are high.

Navigation between pages and binding of the view and viewmodel are central topics of the first two posts.
Yngve proposes to use attributes containing paths to the View on the ViewModel objects to bind the View and ViewModel. He implements methods using reflection and these attributes to look up the View given a ViewModel. Even though Yngve says in his post that "some good'ol reflection (it's not as scary as you might think)", I can't help it, I always get a bit uneasy when I see reflection and attributes containing magic strings that are used to find types. If I can avoid it I prefer to do so, and this is what this post is about.
Are there other ways to bind the View and the ViewModel while still keeping things nice and simple?

Initial architecture

Yngve builds and initial architecture as shown in the diagram below:


The App object contains a MasterViewModel object that acts as a master object keeping track of the CurrentViewModel and the CurrentPage object.

The architecture is based on an assumption that each ViewModel will have one-to-one relationship with the  View.
Having only one ViewModel per View is all fine and dandy to me, but I can see that there may be scenarios where we would like to have more than one View share the same ViewModel.
Jeremy Likness in his post Model-View-ViewModel (MVVM) Explained mentions that multiple views on a single ViewModel could be beneficial if we are to implement a wizard. A single view-model shared between the wizard pages could be nice, but for the sake of simplicity I can live with 1-to-1.

Jeremy Likness also discuss the two ways to drive the creation and discovery process. One can opt to do as Yngve has done, go from the ViewModel to the View, this is referred to as ViewModel first.

Going the other direction is called, you may have guessed it already, View first.

The simple alternative

The MasterViewModel shown above has a method Goto<T> that the View will call when it wants to navigate to a different page.
E.g. in the MainPage we will have a click handler as this:
private void GoToSubpage_Click(object sender, RoutedEventArgs e)
{
    App.ViewModel.Goto<SubPageViewModel>();
}
Which will then navigate from the MainPage to the SubPage.
The goto method will find the Uri to navigate to by looking at the attribute that should be used to decorate the ViewModel class. When it has located the Uri it will use the NavigationService on the View to navigate to the Uri.
Then after the navigation has been done and the View has changed, we handle the navigated event where we see the new Uri and from the Uri we locate the matching ViewModel and set this in the view by settings its DataContext to the new ViewModel.

A simple alternative to this is to bind the ViewModel directly to the view. If the View knows what ViewModel it should bind to it can set the DataContext in its constructor.

Simply modifying MainPage.xaml.cs like this:

    public partial class MainPage : PhoneApplicationPage
    {
        // Constructor
        public MainPage()
        {
            InitializeComponent();
            DataContext = new ViewModels.Pages.MainPageViewModel();
        }
 
        private void GoToSubpage_Click(object sender, RoutedEventArgs e)
        {
            NavigationService.Navigate(new Uri("/SubPage.xaml"UriKind.Relative));
        }
    }


And SubPage as this:


    public partial class SubPage : PhoneApplicationPage
    {
        public SubPage()
        {
            InitializeComponent();
            DataContext = new ViewModels.Pages.SubPageViewModel();
        }
 
        private void GoToMainPage_Click(object sender, RoutedEventArgs e)
        {
            NavigationService.Navigate(new Uri("/MainPage.xaml"UriKind.Relative));
        }
    }


Makes the need for both reflection and attributes go away. When we navigate to SubPage.xaml the View (SubPage) is automatically instantiated and the constructor of the SubPage class is called which will set the DataContext. The equivalent happens when we navigate from the SubPage to the MainPage.

As can be seen from the diagram above we have replaced the more subtle dependency that we had from the ViewModel to the View with a more direct and obvious dependency from the View to the ViewModel.
This is more similar to the dependencies in the Presentation Model pattern by Fowler. MVVM is a specialization of the Presentation Model design pattern.
Although I am more happy to have a dependency in this direction, and to have done away with the reflection and the attributes, I am not to happy about the View constructing the ViewModel.
Nor am I too happy about the ViewModel being created every time we navigate to the page, it means that all ViewModel state is lost every time we navigate away from the page and back.

DataTemplates

While googling the internet for alternative solutions I saw people mentioning that they would do things similar to this:


    <phone:PhoneApplicationPage.Resources>
            <pages:MainPageViewModel x:Key="ViewModel"/>
    </phone:PhoneApplicationPage.Resources>
 
    <!--LayoutRoot is the root grid where all page content is placed-->
    <Grid x:Name="LayoutRoot" Background="Transparent">
      <views:MainPage DataContext="{Binding Source={StaticResource ViewModel}}"/>


This is supposed to bind the View and the ViewModel, but I soon figured out that this simply isn't an option for me as it would not be very different from the "Simple alternative" I just presented. Same drawbacks as already mentioned in previous discussion above that the ViewModel can't have constructor parameters. It is still the view constructing the viewmodel and still a very hard binding from the View to the ViewModel.
Finally I couldn't make it work, adding the above xaml would cause errors, and since I didn't like the solution anyway I didn't bother to try figure out what was wrong.

MEF

Managed Extensibility Framework could provide some of the functionality that I am looking for, but sadly it seems to not be supported for Windows Phone 7 because of missing features in the base class libraries available for Windows Phone 7 applications. Damon Payne has made an unofficial MEF-for-Windows-Phone-7, but I suppose for those of us who aren't black belt Windows Phone 7 hackers yet, there may be other options that will make the learning curve a bit easier.

UltraLight

Jeremy Likness has published the Ultra Light MVVM for Windows Phone 7 micro framework.
It does View-first binding of the View and the ViewModel in addition to a number of other features.
It implements the binding using a "homegrown" servicelocator, which will be called from the View constructor.

To use UltraLight we need to download and build the 8 classes and 6 interfaces that are the Ultra Light framework.

The views now should look as this:

    public partial class MainPage : PhoneApplicationPage
    {
        // Constructor
        public MainPage()
        {
            InitializeComponent();
            BindToViewModel<IMainPageViewModel>(LayoutRoot);
        }
        private void GoToSubpage_Click(object sender, RoutedEventArgs e)         {             NavigationService.Navigate(new Uri("/SubPage.xaml"UriKind.Relative));         }     }

    public partial class SubPage : PhoneApplicationPage
    {
        public SubPage()
        {
            InitializeComponent();
            BindToViewModel<ISubPageViewModel>(LayoutRoot);
        }
 
        private void GoToMainPage_Click(object sender, RoutedEventArgs e)
        {
            NavigationService.Navigate(new Uri("/MainPage.xaml"UriKind.Relative));
        }
    }


The BindToViewModel method is an extension method that among other things will find the ViewModel class implementing the specified ViewModel interface and then attach this to the View by setting the DataContext property of the LayoutRoot object to the located ViewModel object.

For this to work the map between ViewModel interfaces and the ViewModel classes must be registered. This will be done in the application launched event handler of the App object:

      private static void _RegisterViewModels()
        {
            UltraLightLocator.Register<IMainPageViewModel>(new MainPageViewModel());
            UltraLightLocator.Register<ISubPageViewModel>(new SubPageViewModel());
        }
 
        // Code to execute when the application is launching (eg, from Start)
        // This code will not execute when the application is reactivated
        private void Application_Launching(object sender, LaunchingEventArgs e)
        {
            _RegisterViewModels();
        }


The final requirement is that all the ViewModel classes must implement an interface and they have to inherit from the framework class called BaseViewModel. The BaseViewModel class has an abstract property called ApplicationBindings which we also are required to implement.
Haven't figured out exactly why this is, but I may be using the framework wrong on this point.

        /// <summary>
        ///     For pages, the list of commands to bind to application bar buttons
        /// </summary>
        public override IEnumerable<IActionCommand<object>> ApplicationBindings
        {
            get { return new IActionCommand<object>[0]; }
        }


In my opinion the Ultra Light framework looks promising as a starting point for doing Windows Phone 7 development. It's not too big or complex while still providing what seems to be a number of useful features.

Caliburn.Micro

Caliburn.Micro is a small framework that can be used for both WPF, Silverlight and Windows Phone 7 applications. Caliburn.Micro is a bit larger than Ultra Light, about 50 classes, but I believe it has more functionality. It comes with full source, which will by default be a part of your project. It is distributed under the MIT license.  It is built by Rob Eisenberg who presented a lot of the principles that Caliburn.Micro is based on in his talk Build Your Own MVVM Framework at MIX10.
I have watched the MIX10 video, but I haven't got much time to play with this framework yet, but so far it seems to be pure awesomeness!

To create a caliburn.micro WP7 app we must first download the zip file containing three folders

In the templates folder you will find the three project templates zip files, one for each of the supported platforms. There's also a readme.txt file there describing exactly what you need to do.
After you have copied the Caliburn_Micro_WP7.zip to the right folder you can fire up Visual Studio and you should now have a new project type available, select this and you will get a project with all the required files and you are good to go.

Look mum, no code behind!


In the figure above you can see my complete Visual Studio Solution that implements the same application as Yngve did in his blog posts. If you look at the the two views, MainPage.xaml and SubPage.xaml, you will notice that there is no code-behind. There's nothing special in the xaml file either, same as we have had in the previous examples.
All the code is in the ViewModel class

    public class MainPageViewModel 
    {
        private INavigationService NavigationService { getset; }
 
        public MainPageViewModel(INavigationService navigationService)
        {
            Title = "Kick Ass";
            NavigationService = navigationService;
        }
 
        public string Title { getprivate set; }
 
        public void GoToSubpage()
        {
            NavigationService.Navigate(new Uri("/SubPage.xaml"UriKind.Relative));
        }            
    }


The ViewModel can be wired up with a NavigationService if we want to do navigation as shown above.

There is also a automatically generated file called AppBootstrapper. This is where we need to register our ViewModel classes. So for our little demo app that has two pages which we can navigate between we just need to register our two ViewModel classes and we are done.


There are no reference in the ViewModel to the View. I haven't dived enough into the details to explain exactly how the binding of the View and ViewModel works, but it is based on convention, and it simply works.
It of course has to be based on some sort of reflection, but I don't have to introduce any clutter like attributes or anything into my classes. Further it is driven by very natural conventions. I name the classes as I think I should do anyways and that's it. The ViewModel class is named ending with "ViewModel", which now tells both me and Calliburn that this is the ViewModel for the View that has the same name, except the ViewModel postfix. Furthermore, the Caliburn.Micro comes with a default IoC container, but the framework is configurable. If I somewhere down the line decides that I don't like the default container, I can plug in a different one.

The programming by convention is really used all over this framework, and to me this looks as having been done with great success.
If you look again at the MainPageViewModel above you will notice the GoToSubpage() method.
Then look at this snippet from the MainPage.xaml.


As you will notice, the button has the same name as the method in the ViewModel. That is all we need to do. When the user clicks this button, the GoToSubpage method in the ViewModel will be called and we can navigate to the next page, or whatever we want to do when the user clicks our button. Awesome!

The Caliburn.Micro is ViewModel-first, but it still can have multiple view for a single ViewModel. There's an eplanation of how they do it at the Caliburn.Micro codeplex site in the section Multiple Views over the Same ViewModel.
If you want to read more on Caliburn there's quite a lot more on the codeplex site for Caliburn.Micro Caliburn documentation.


A list of links to stuff I have read when researching this post:
http://www.wintellect.com/CS/blogs/jlikness/archive/tags/ultra+light/default.aspx
http://blogs.msdn.com/b/davihard/archive/2010/05/10/repost-mvvm-providing-the-association-of-view-to-viewmodel.aspx

And I haven't forgotten about the Wix project template, its coming, I just had to check out WP7 first :-)