Today I will show how we can extend a project template with a wizard as shown below and thus completely remove the required XML editing.

The Microsoft documentation can lead the unwary to believe that wizards in project templates require assemblies to be GAC'ed which isn't supported by VSIX files. Don't worry, a real wizard doesn't need mundane tools such as a GAC.
 |
| Image based on original by jdhancock |
The Wizard
The MSDN article How to: Use Wizards with Project Templates describes some of the steps required to implement a project template wizard, but as we will see, don't believe all that MSDN tell you.The first step is to create a Class Library assembly. This assembly should contain a class that implements the IWizard interface that is defined in the Microsoft.TemplateWizard namespace in the Microsoft.VisualStudio.TemplateWizardInterface assembly, and the GUI of your wizard.
For our Project Template the only method that we actually need to implement from the IWizard interface is the RunStarted method. All the others we will implement as empty methods.
The RunStarted method is called when you create a new project and this is the time that we will ask you what you want to put in your Project.wxs XML file. You will be presented with a simple dialog box where you are asked to fill in a form. Your answers will be used to create the WIX XML without you having to even open that XML file.
Here is what the method looks like when we have added the code to create the form and added the user response to the replacementsDictionary.
public void RunStarted(object automationObject,
Dictionary<string, string> replacementsDictionary,
WizardRunKind runKind, object[] customParams)
{
try
{
// Display a form to the user. The form collects
// input for the custom message.
var inputForm = new UserInputForm(GetProjects(automationObject as DTE2));
inputForm.ShowDialog();
var projectInfo = new ProjectInfo(inputForm.Project);
// Add custom parameters.
replacementsDictionary.Add("$manufacturer$", inputForm.Manufacturer);
replacementsDictionary.Add("$serviceExeName$", projectInfo.ServiceExeName);
replacementsDictionary.Add("$servicePath$", projectInfo.ServicePath);
replacementsDictionary.Add("$serviceName$", inputForm.ServiceName);
replacementsDictionary.Add("$productName$", inputForm.ServiceName);
replacementsDictionary.Add("$displayName$", inputForm.DisplayName);
replacementsDictionary.Add("$description$", inputForm.ServiceDescription);
replacementsDictionary.Add("$serviceControlName$", inputForm.ServiceControlName);
}
catch (Exception ex)
{
MessageBox.Show(ex.ToString());
}
}
private IEnumerable<Project> GetProjects(DTE2 dte)
{
if (dte == null)
{
DisplayMessage("Failed to access the Visual Studios DTE object, can't get projects");
return new List<Project>();
}
var solution = dte.Solution as Solution2;
if (solution == null)
{
DisplayMessage("Failed to access the Solution of Visual Studios DTE object, can't get projects");
return new List<Project>();
}
return solution.Projects.Cast<Project>();
}
The replacementsDictionary is used to replace all the occurences of the given keys with the given values from the form.
The GetProjects method gets the list of existing projects in the current solution. This means that we can select the Windows Service project that we want to create are installer for from the existing projects in the solution. The implementation assumes a simple solution structure, if you are using something different you may have to adjust the resulting the path in the Product.wxs file to fit your solution.
The UI I have used is a regular Windows Form, but you should be able to use a WPF based UI as well.
The MSDN documentation says we need to sign the Wizard assembly, but it seems to work just fine without signing, and as we are not going to install the Wizard assembly into the GAC I don't see why we need to have a strong named assembly, so I have skipped that part.
Adding the Wizard To the Template
The MSDN article How to: Use Wizards with Project Templates states:The assembly that implements IWizard must be signed with a strong name and installed into the global assembly cache.This would be a real bummer if it was true, as VSIX doesn't support installing assemblies into the GAC and I try to avoid GAC'ing assemblies if I can since I think it often makes things more complicated than need be.
What to do when MSDN says: "No, you can't"? Then we of course turn the speakers volume on our laptop and play the theme song of the great British TV show Bob the Builder on Spotify, and listen to the Bob and his friends singing "Can we fix it? Yes we can!" while googling for a more positive answer than the MSDN one.
 |
| Bob the Builder image based on original by jdhancock |
The first step is to go to the Assets tab of the vsixmanifest designer and add a reference to wizard assembly:
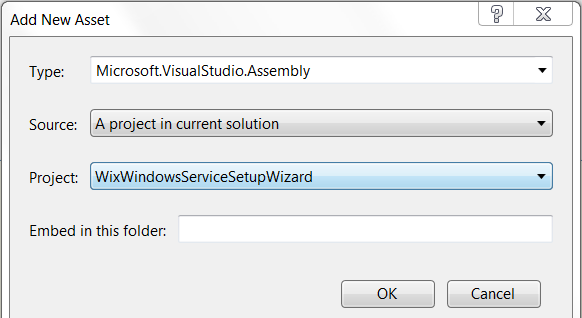
The next step is to edit the VSIX template which is inside the Project Template that we added when creating the VSIX project.
One way of doing it is to locate the project template zip file and open it in 7-zip, and select the .vstemplate file there and choose Edit.
The .vstemplate is an XML file and should look similar to this when we have edited it.
<VSTemplate Version="3.0.0" xmlns="http://schemas.microsoft.com/developer/vstemplate/2005" Type="Project">
<TemplateData>
<Name>Wix 3.6 Windows Service Setup Project</Name>
<Description>Template to create a windows service setup project</Description>
<ProjectType>WiX</ProjectType>
<ProjectSubType>
</ProjectSubType>
<SortOrder>1000</SortOrder>
<CreateNewFolder>true</CreateNewFolder>
<DefaultName>WindowsServiceSetup</DefaultName>
<ProvideDefaultName>true</ProvideDefaultName>
<LocationField>Enabled</LocationField>
<EnableLocationBrowseButton>true</EnableLocationBrowseButton>
<Icon>WixProject.ico</Icon>
</TemplateData>
<TemplateContent>
<Project TargetFileName="MyWindowsService.Setup.wixproj" File="MyWindowsService.Setup.wixproj" ReplaceParameters="true">
<ProjectItem ReplaceParameters="true" TargetFileName="Product.wxs">Product.wxs</ProjectItem>
</Project>
</TemplateContent>
<WizardExtension>
<Assembly>WixWindowsServiceSetupWizard, Version=1.0.0.0, Culture=Neutral, PublicKeyToken=null</Assembly>
<FullClassName>WixWindowsServiceSetupWizard.SetupWizard</FullClassName>
</WizardExtension>
</VSTemplate>
The wizard assembly is hooked into the project template by adding a WizardExtension element containing an assembly reference to the assembly containing the class that implements the IWizard interface.
As you can see there is no PublicKeyToken (the assembly is not signed) and there is nothing in the GAC, but it seems to work anyway.
The wizard assembly is deployed to the extensions folder below the user app data folder
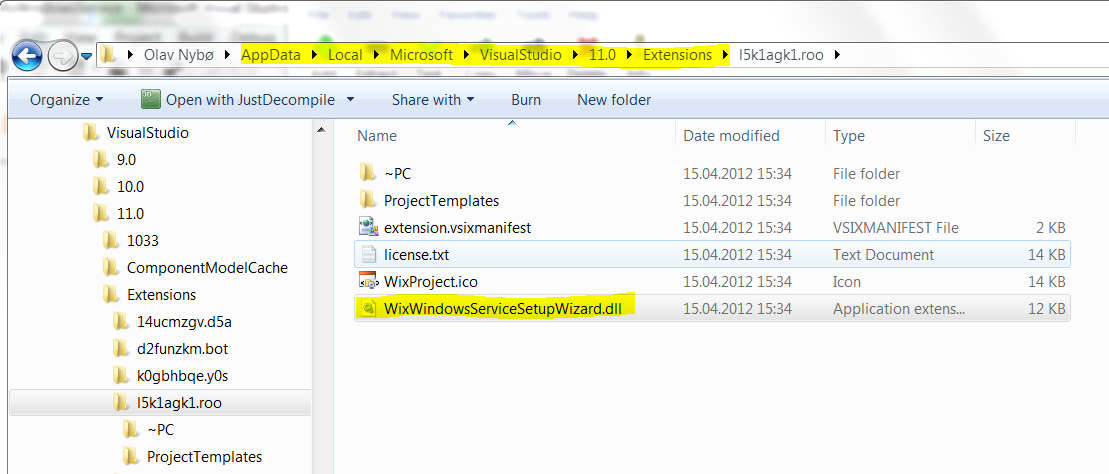
If we look at the extension.vsixmanifest we'll see that the assets we added in the designer above has been compiled into the following XML (and again, no signing here):
<Assets>
<Asset Type="Microsoft.VisualStudio.ProjectTemplate" Path="ProjectTemplates" />
<Asset Type="Microsoft.VisualStudio.Assembly" Path="WixWindowsServiceSetupWizard.dll" AssemblyName="WixWindowsServiceSetupWizard, Version=1.0.0.0, Culture=neutral, PublicKeyToken=null" />
</Assets>
I have updated the Wix Windows Service Setup Project Template on Visual Studio Gallery with the new Wizard solution.
Developing Visual Studio Project Wizards is a detailed although dated article on how to create a Project Wizard.
Walkthrough: Creating a Custom Action Project Item with an Item Template, Part 2 also has some interesting information even if it also talks about some SharePoint stuff.
I have installed the extension - but no new project type templates are available. I've restarted VS2011 multiple times - uninstalled and reinstalled the extention - version 1.1.1 and still can't find any templates. Is there something I'm missing?
ReplyDeleteWhat version of wix have you installed?
Delete